The site survey is the foundation of every physical security system installation or refresh. But the typical process is burdened down with manual processes, communication misunderstandings, expertise gaps, and a lack of precision. To help campus and corporate security leaders and system integrators evolve their physical security site survey process, we’ve compiled a best practices checklist for effective site walk preparation and execution. Read on to learn about the elements included in the checklist and to download your free copy
Why Is a Site Survey Important?

The site survey is an information and security assessment process typically needed for a few reasons 1) to document an existing security system, 2) to plan and budget for a new system design or incremental security measures, 3) to plan how new technology can improve a security posture. The outcome of a high-quality site survey can turn into:
- An accurate as-built or system of record
- A budgetary estimate
- A decision-ready proposal
- An installation and lifecycle management plan
Getting the site survey right is often the difference between a successful project design and implementation. or one plagued with delays and other problems. And while there’s no single prescribed method for conducting a site survey, some methods work better than others for accuracy, efficiency, and ongoing benefits.
The status quo involves outdated tools such as paper floor plans, pictures on cell phones, spreadsheets, PDFs and frustration.
Compare that to the power of using a modern, digital site survey tool. One that makes it easy to capture needs, select the right security devices, visualize with stakeholders, collaborate with experts, and gather all of the information in one system of record that is accessible from anywhere at any stage in the security system life cycle. This is a game changer and below are best practices that work best with a digital platform as opposed to using dated, manual methods.
What Happens During a Site Survey?

A site survey starts (at least, it should start) with a floor plan of the building, satellite image of a parking lot, or other area to be documented, outfitted or upgraded.
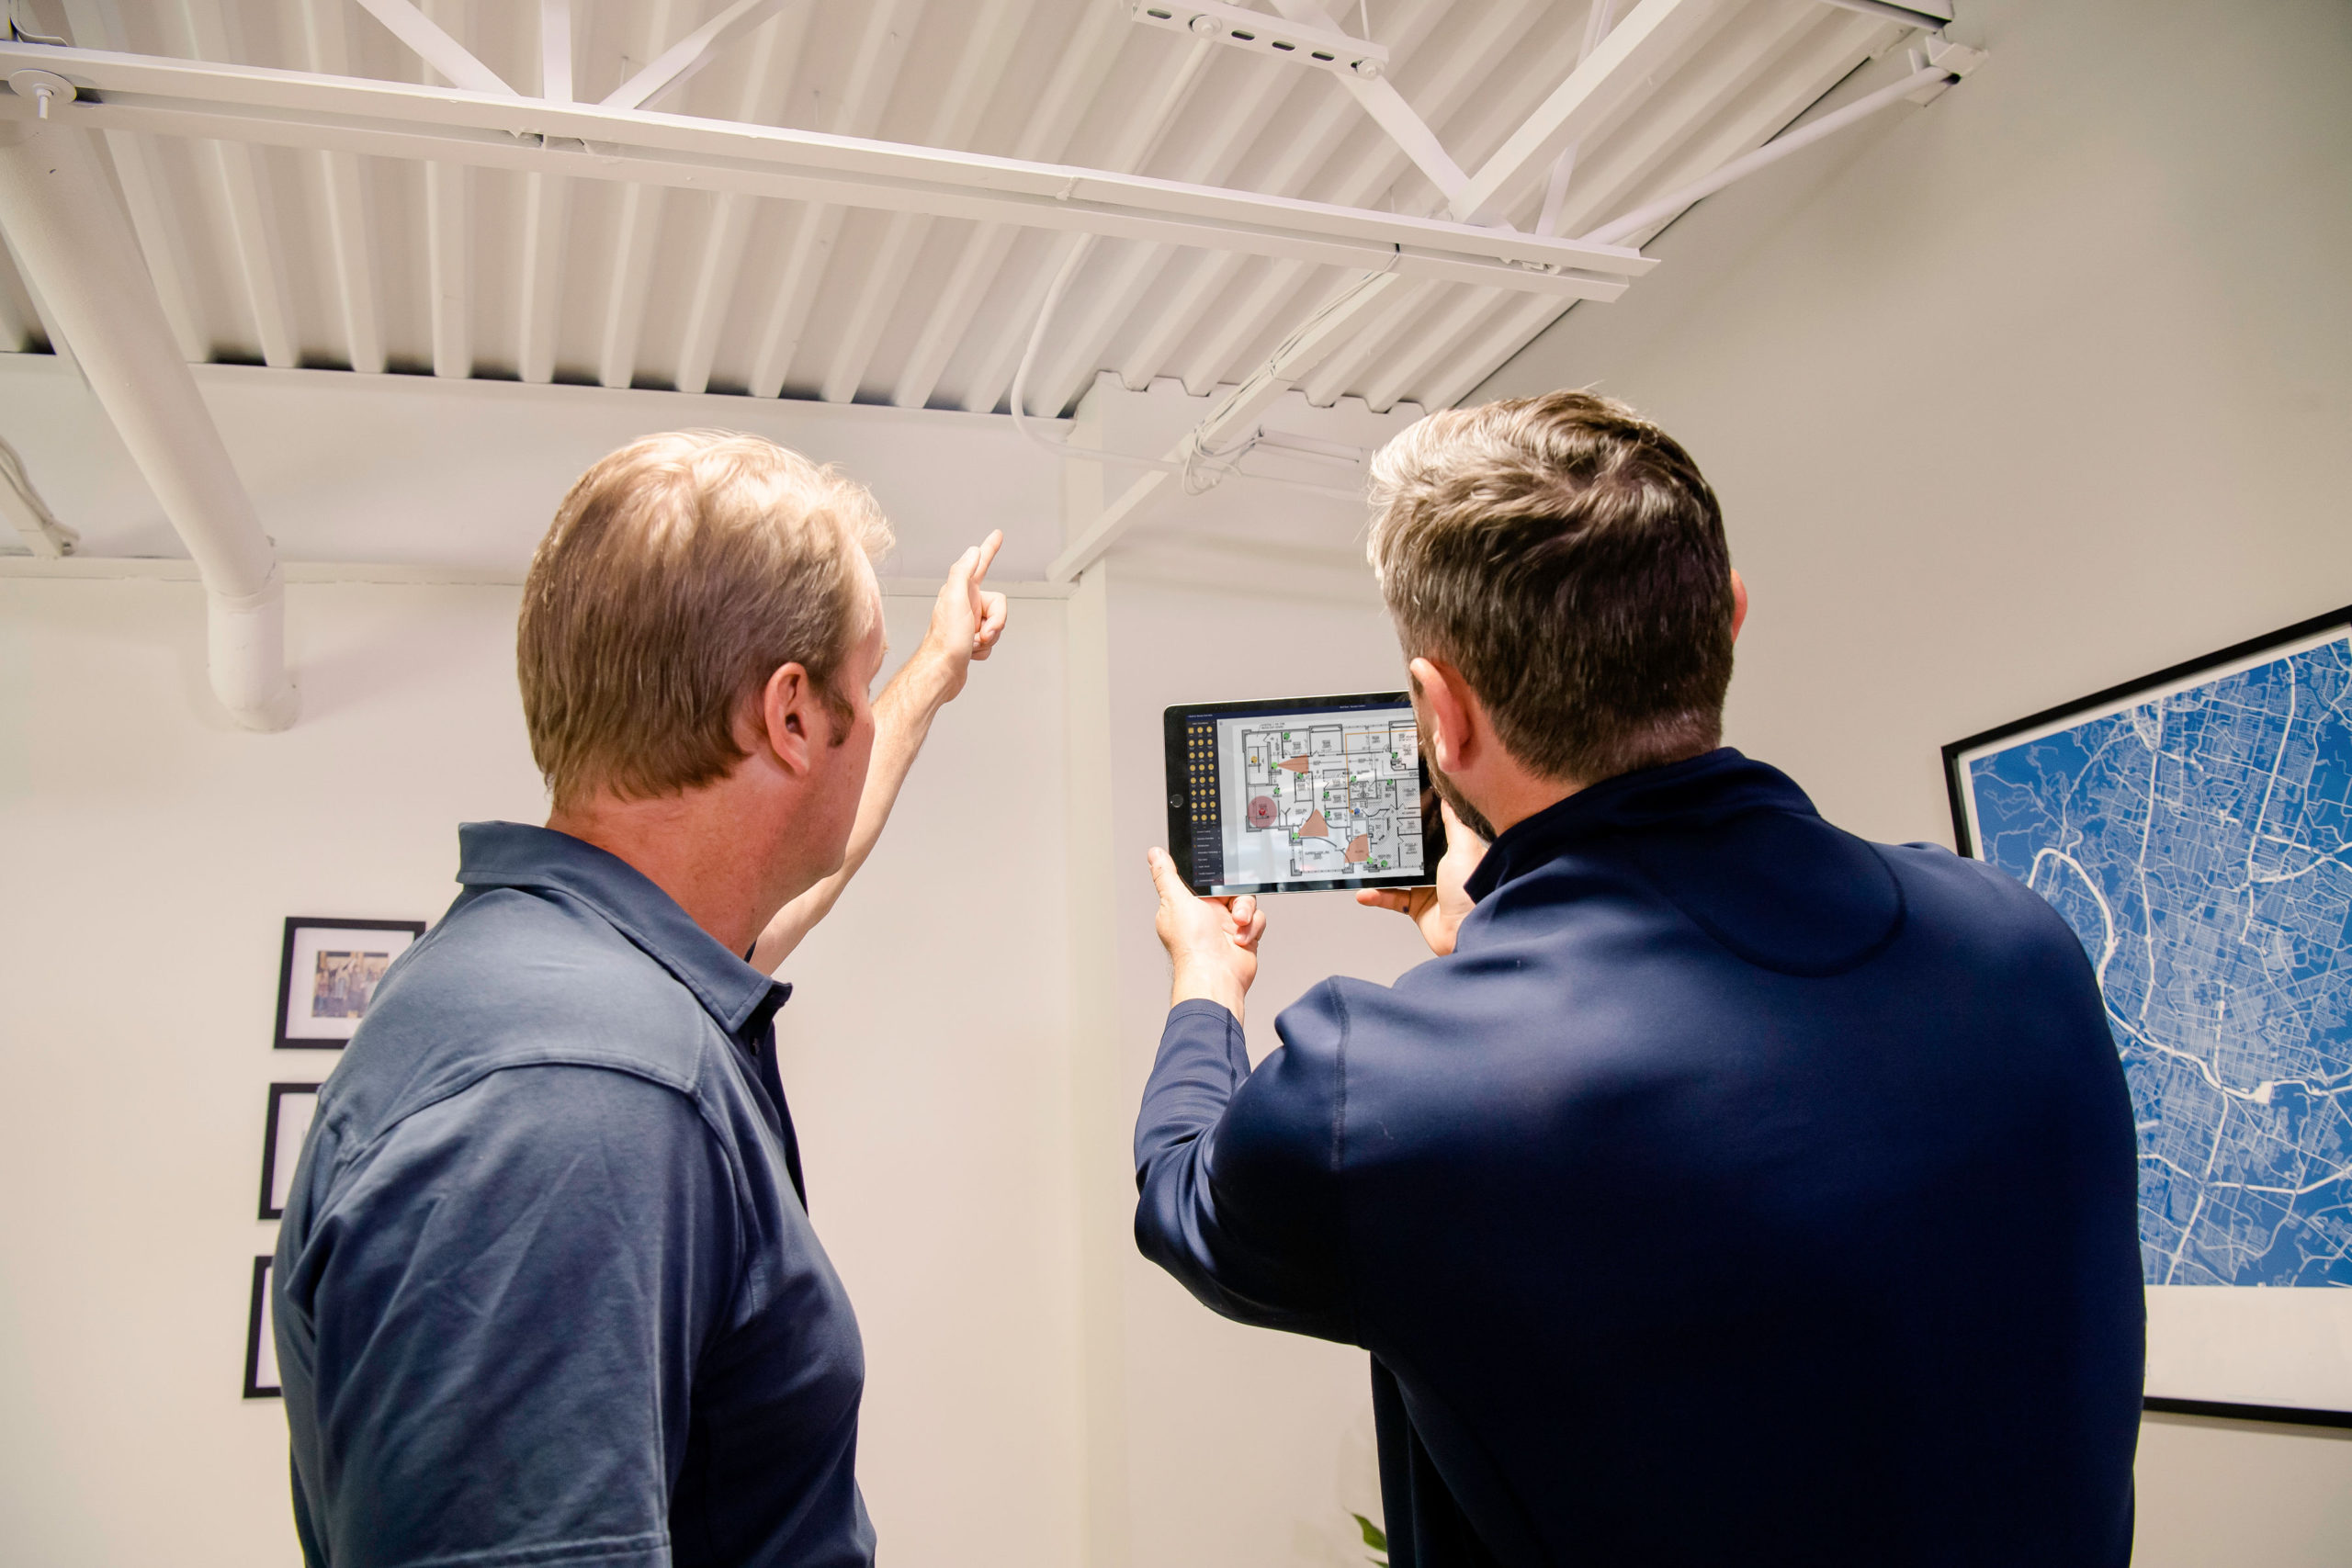
Oftentimes, a qualified technology manager or system integrator (SI) will visit the site for a walkthrough, during which time they will note what security systems are already in place and what will be needed as part of the new physical security measures installation or for documentation. It’s common to take photos during the site survey as well.
Ideally, during the site survey, it is wise to capture additional details that will be relevant to a security system design and the installation (ceilings, walls, closets, cabling/wire runs etc.). The more detail you can capture and communicate in the security assessment, the better to ensure a successful decision-ready proposal.
What You Should Capture in a Site Survey (and How to Prepare)
Getting the site survey process right is vital, and so is capturing the correct information in one place. Below we’ll elaborate on every single point on our downloadable checklist so you can know exactly what to capture as you survey the site — and how to be optimally prepared before you start.
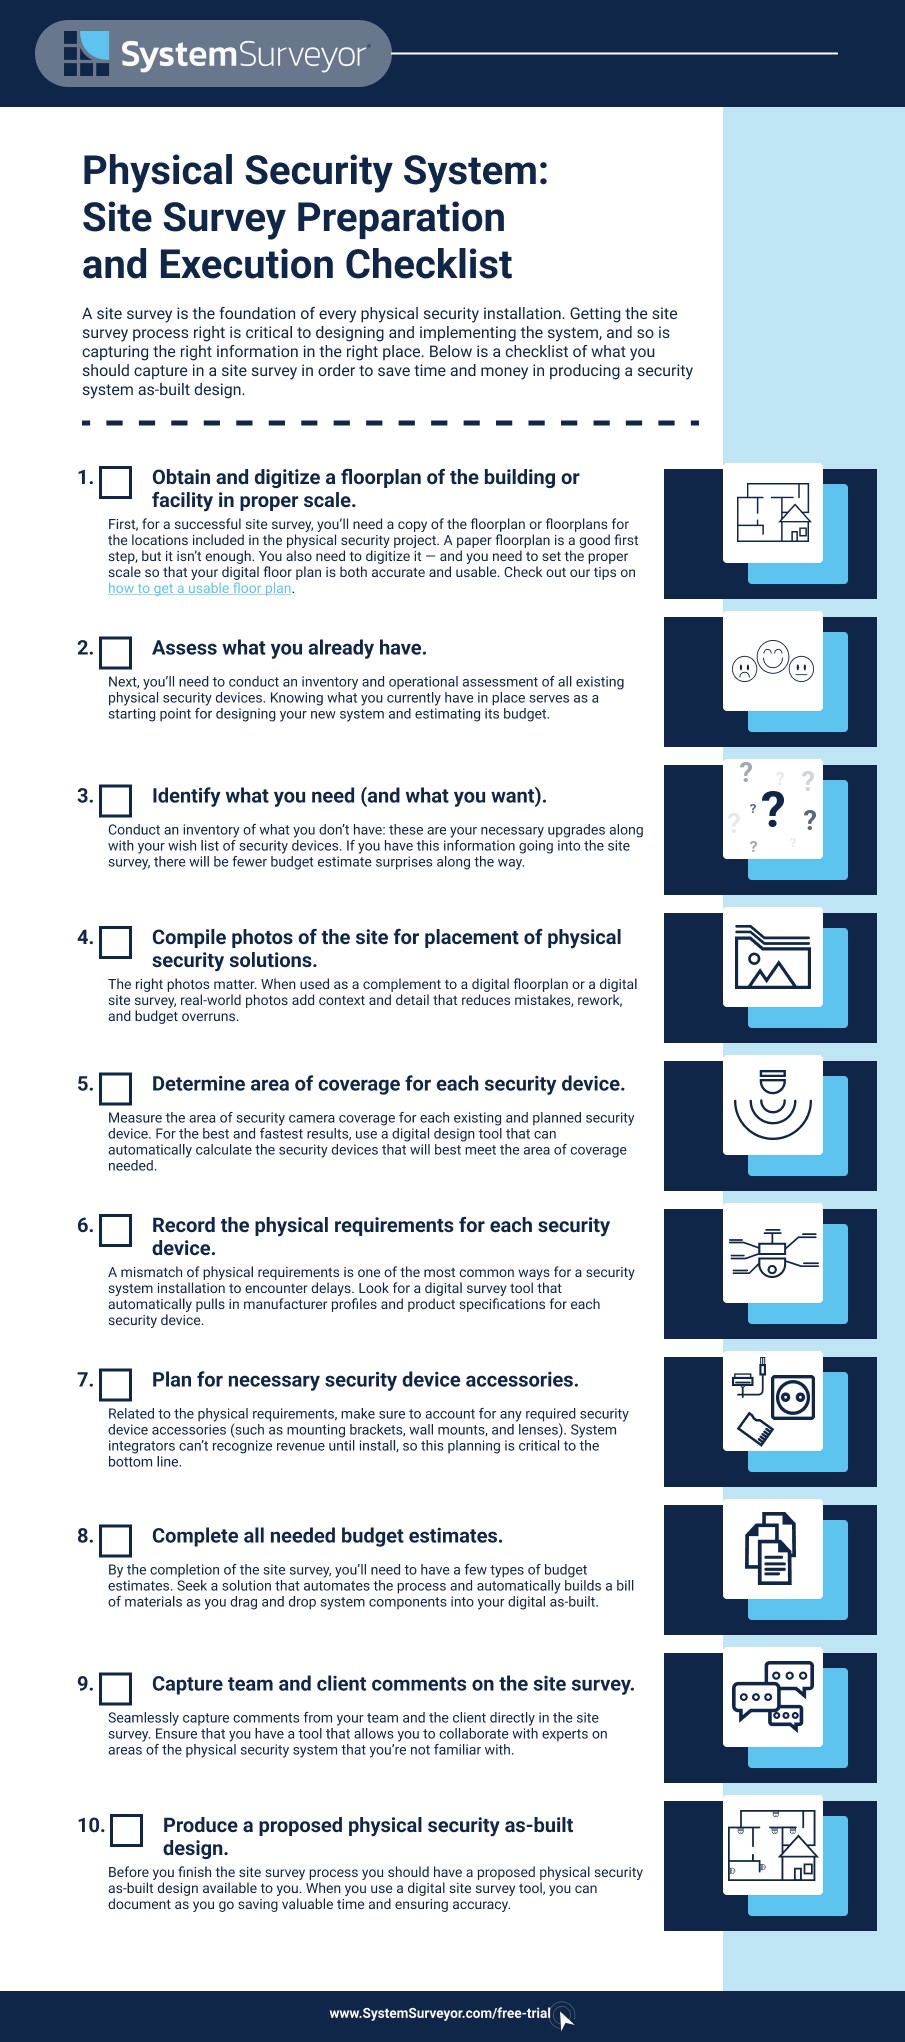
1. Obtain and digitize a floor plan or image of the buildings or facilities in proper scale.
First, for a successful building site survey, you’ll need a copy of the floor plan or floor plans for the locations included in the physical security assessment. No amount of measuring, cellphone pictures, and handwritten notes can ever compete with an accurate floor plan in terms of how accurate your site survey end product will be. For outdoor projects and parking lots, you’ll need satellite imagery.
A paper floor plan is a good first step, but it isn’t enough. You also need to digitize it — and you need to set the proper scale so that your digital floor plan is both accurate and usable. For parking lots and outdoor locations, using an application that has integration with Google Maps for a satellite image with automatic scaling will also save time and streamline the process.
Struggling to get a usable floor plan (digital or not)? We’ve been there. And we’ve collected several creative strategies for getting a digitized floor plan. Check out 5 Helpful Tips to Get a Customer’s Floor Plan to learn more.
2. Assess what you or your client already have.
Next, you’ll need to conduct an inventory and operational assessment of all existing physical security devices. Unless you’re outfitting a new build or your remodel is so extensive that the previous floor plan no longer makes sense as a starting place, then your existing security device inventory and map is a vital resource.
For one, you’ll often have some existing physical security inventory that you intend to keep. You need to know what that is and where it is, down to the last cable for a seamless integration. And even if you’re replacing the entire physical security system, knowing what you currently have in place and the security gaps serves as a starting point for designing your new system and estimating its budget.
3. Identify what you need (and what you want) to improve the security posture.
Next up is identifying what you’ll need to provide proper coverage for video surveillance or CCTV, access control, intrusion detection and other technologies and the pieces needed to make a physical security system operational. During the site survey, using a digital tool, it is helpful to conceptualize these pieces for further work once the site survey is completed. Today’s digital site survey tools allow some of this initial work to be done in the field during the site walk that previously were not possible on a paper floor plan and pencil.
With new AI and advanced technologies available, using a tool that can take a step towards automating planning, product selection and budgeting will be helpful. Keep in mind that you’ll want to share this design and tap into expertise from your security equipment vendors.
4. Compile photos of the site for placement of physical security solutions.
A picture is worth a thousand words. Taking photos and immediately associating them in a digital floor plan saves hours in the next step of design planning. Moreover, it increases accuracy by providing context to engineers, designers and estimators (and ultimately installers) about the precision location of where security devices need to be mounted and installed in order to provide effective security.
When this is done on a cell phone, pictures are difficult to share and associate and get left out of the design process with frustrating results. A tablet based system design tool has an integrated camera and an app that can help you associate photos. Drag and drop a device, take a picture, immediately associate to the device in a site survey. This is hands down one of the best ways to improve your security site survey process.
5. Determine area of coverage security & IT devices.
Next up, for many technologies, you’ll need to visualize and measure the area of coverage to ensure you design will meet the requirements. As an example, for video surveillance, it is important to determine the area of security camera coverage required to meet the security solution need. This is not reserved only for CCTV cameras but also for motion detectors, sensors, alarm systems, Wi-Fi access points, cabling and other pieces of the solution. When you can share the expected results and resolution or coverage area with a stakeholder, it will increase confidence and understanding of what the security technology is expected to deliver. For the best and fastest results, use a system design tool or floor plan design software that can automatically calculate the device coverage area and offer product options to meet those needs.
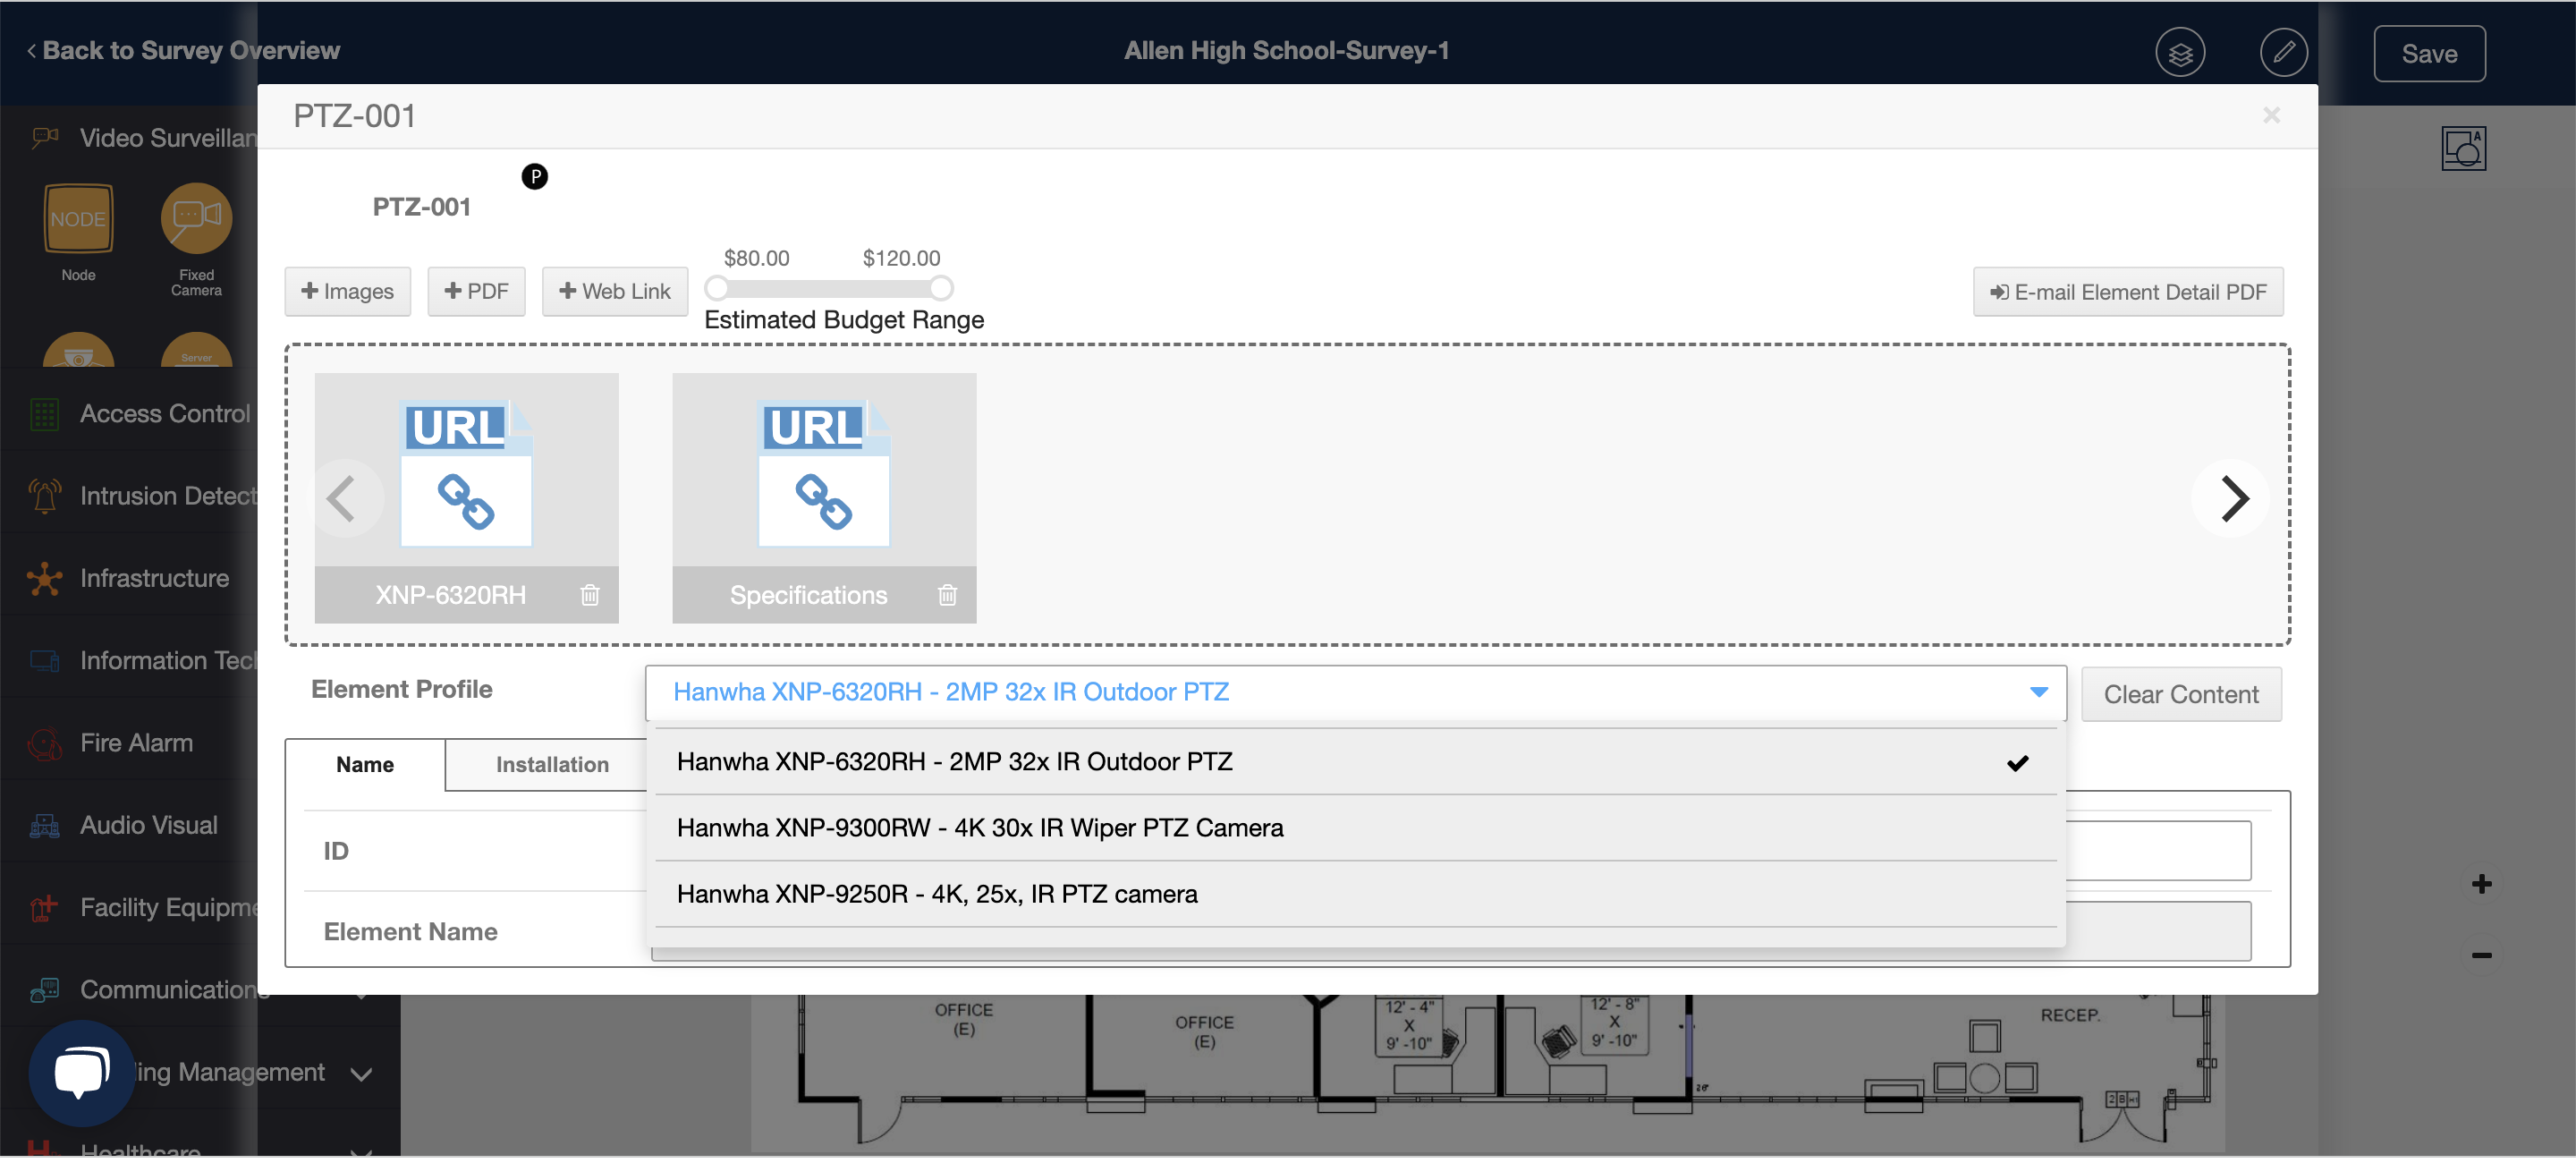
6. Record the physical requirements for each security device.
A mismatch on physical requirements is one of the most common ways for a security system install to hit delays. Every product has its own specifications regarding mounting, clearance, operating temperature, and many more elements. When a system integrator shows up with a security camera that can’t physically be mounted in the prescribed spot, delays are inevitable.
The needed information is almost always included in the profiles and product specifications of security devices. Look for a digital survey tool that automatically pulls in manufacturer details like these. For example, System Surveyor can provide “Element Profiles” that allow site surveyors to tap into manufacturer catalogs or build their own security device profiles to make this process easier, accurate and streamlined.
7. Plan for security device accessories.
Related to the physical requirements, make sure to account for any required security device accessories (such as mounting brackets, wall mounts, lenses, back boxes, and so forth). A fleet of smart security cameras are nearly useless without a fleet of matching brackets. And given the challenges of the supply chain, a mismatch discovered on installation day could result in a delay of months.
Add in the fact that most of the time, system integrators can’t serve a customer and thus can’t recognize revenue until install, and this planning becomes vital even to customer satisfaction and cashflow.
8. Complete budget estimates.
Based on the information captured during the site survey, typically the next step is to create budget estimates, including security device pricing, device quantity, labor and installation.
This process can be intensely manual and time consuming, but it doesn’t have to be. Seek a security system design software solution that automates the process from the first drag-and-drop functionality. With the right tool, you can automatically build a bill of materials as you drag and drop security system components onto your dynamic as-built. With building automation estimation software (or with this functionality built into your security system design software), you’ll get an estimated bill of materials that delivers accurate results and instantly improves the customer experience.
Best of all: no more building spreadsheets after the fact!
9. Capture team and client comments on the site survey.
Ideally, you’ll want to seamlessly capture comments from your team and the client, directly in the site survey. You’ll also want to ensure that you have a design tool that allows you to collaborate with experts on areas of the physical security system that you’re not familiar with or with subcontractors who will be vital to implementation.
10. Produce dynamic documentation to manage the System Life-Cycle.
When you use best practices for a site survey and a digital tool for the job, you’ll come out with the important documentation of the “as-built” for the security system design and the ultimately the final installation.
That documentation is important to everyone involved in the project: the end user client, the system integrator, subcontractors and others. Ideally, you’ll see the as-built that is ultimately installed – but this is also where to consider the life-cycle management of the system.
No physical security system is without moves, adds, changes and technology aging. Site surveys become a cyclical process overtime and documentation will be valuable for inspections, budgeting and planning for technology refreshes. It is also extremely valuable to support safety and security communications with monitoring companies, public safety, administrators, facilities and more.
Why a Digital Site Survey Tool Is the Way to Go

At nearly every step in the site survey process to managing the ongoing life-cycle of a system, digital site survey software such as System Surveyor enhances the process in multiple ways. By using cloud-based, mobile and collaborative tools, you’ll streamline the entire process, increase accuracy, get a better visual of the security system layout, and have a central location for collaborating with clients, vendors, and physical security experts.
Ready to see System Surveyor for yourself? Start your free demo today.
Also, we know this checklist is most useful when you can take it with you wherever you go. That’s why we’ve turned it into a free downloadable infographic! Download our checklist now to make sure you’re always prepared for your site survey.